Navigate360 AI Tools (NavAI)

Smarter Messaging. Simpler Reporting. Faster Filters.

NavAI brings the power of AI into Navigate360—the University’s student success tool—offering intuitive tools to write clearer messages, find the right reports, and filter data faster using natural language. No technical expertise required.


What Can NavAI Do?

NavAI equips you with built-in AI tools to enhance communication, simplify reporting, and apply data filters using plain language within Navigate360.

Tool What It Does Who It Helps

NEW: AI Meeting Summary Assistant

Generates draft appointment notes and action items using live transcription Faculty, Academic Advisors

AI Message Creator and Enhancer

Enhances tone, clarity, and length of your messages

Faculty, Academic Advisors

AI Report Finder

Recommends the best report based on your question Report Users

AI Filter Assistant

Builds report filters from plain-language prompts V3 Report Users


Using NavAI Tools

View instructions on how to use the NavAI tools available for enhancing messaging, reporting, and data filtering within Navigate360.

AI Meeting Summary Assistant

You can use the AI Meeting Summary Assistant to summarize key discussion topics, document decisions made, capture action items (who/what/when), list referrals/resources provided, and outline follow-up plans.

Accordion Group

Open All Tabs
  • Using the AI Meeting Summary Assistant

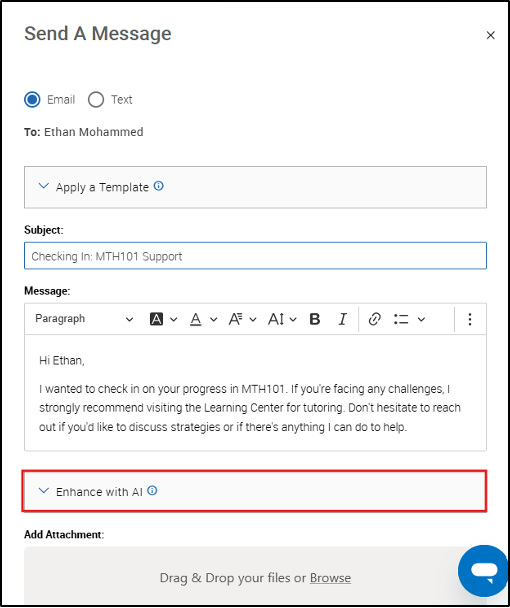
    1. During a student appointment, open the Appointment Summary Report and locate the AI tool area on screen.
    2. Select Meeting Summary Assistant to activate live transcription.
      • Confirm that the student has provided explicit consent before turning it on.
      • If the meeting is conducted online (e.g., via Zoom), you may instead use the Zoom-generated meeting transcript to help generate the summary.
      • The assistant will begin generating a draft transcript during the meeting.
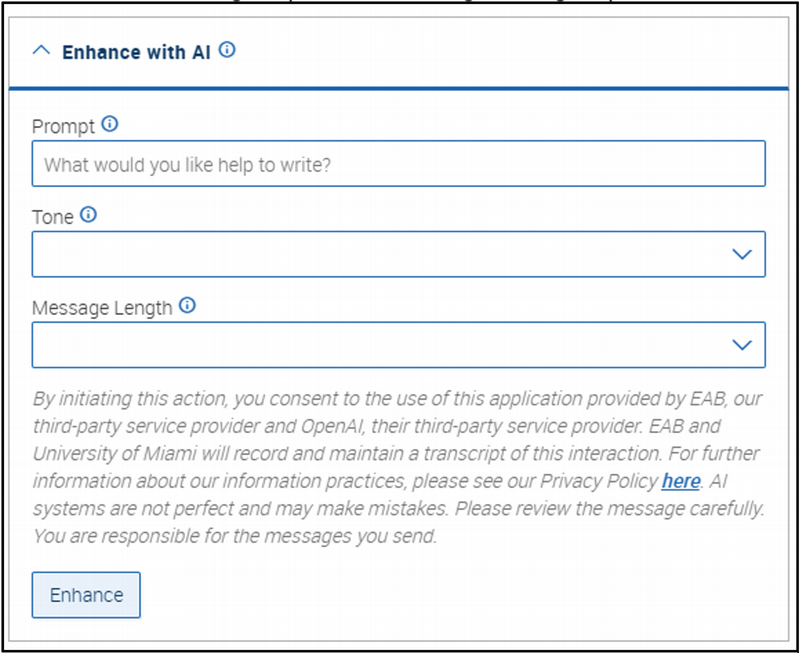
    3. After the appointment discussion, click to generate the AI summary.
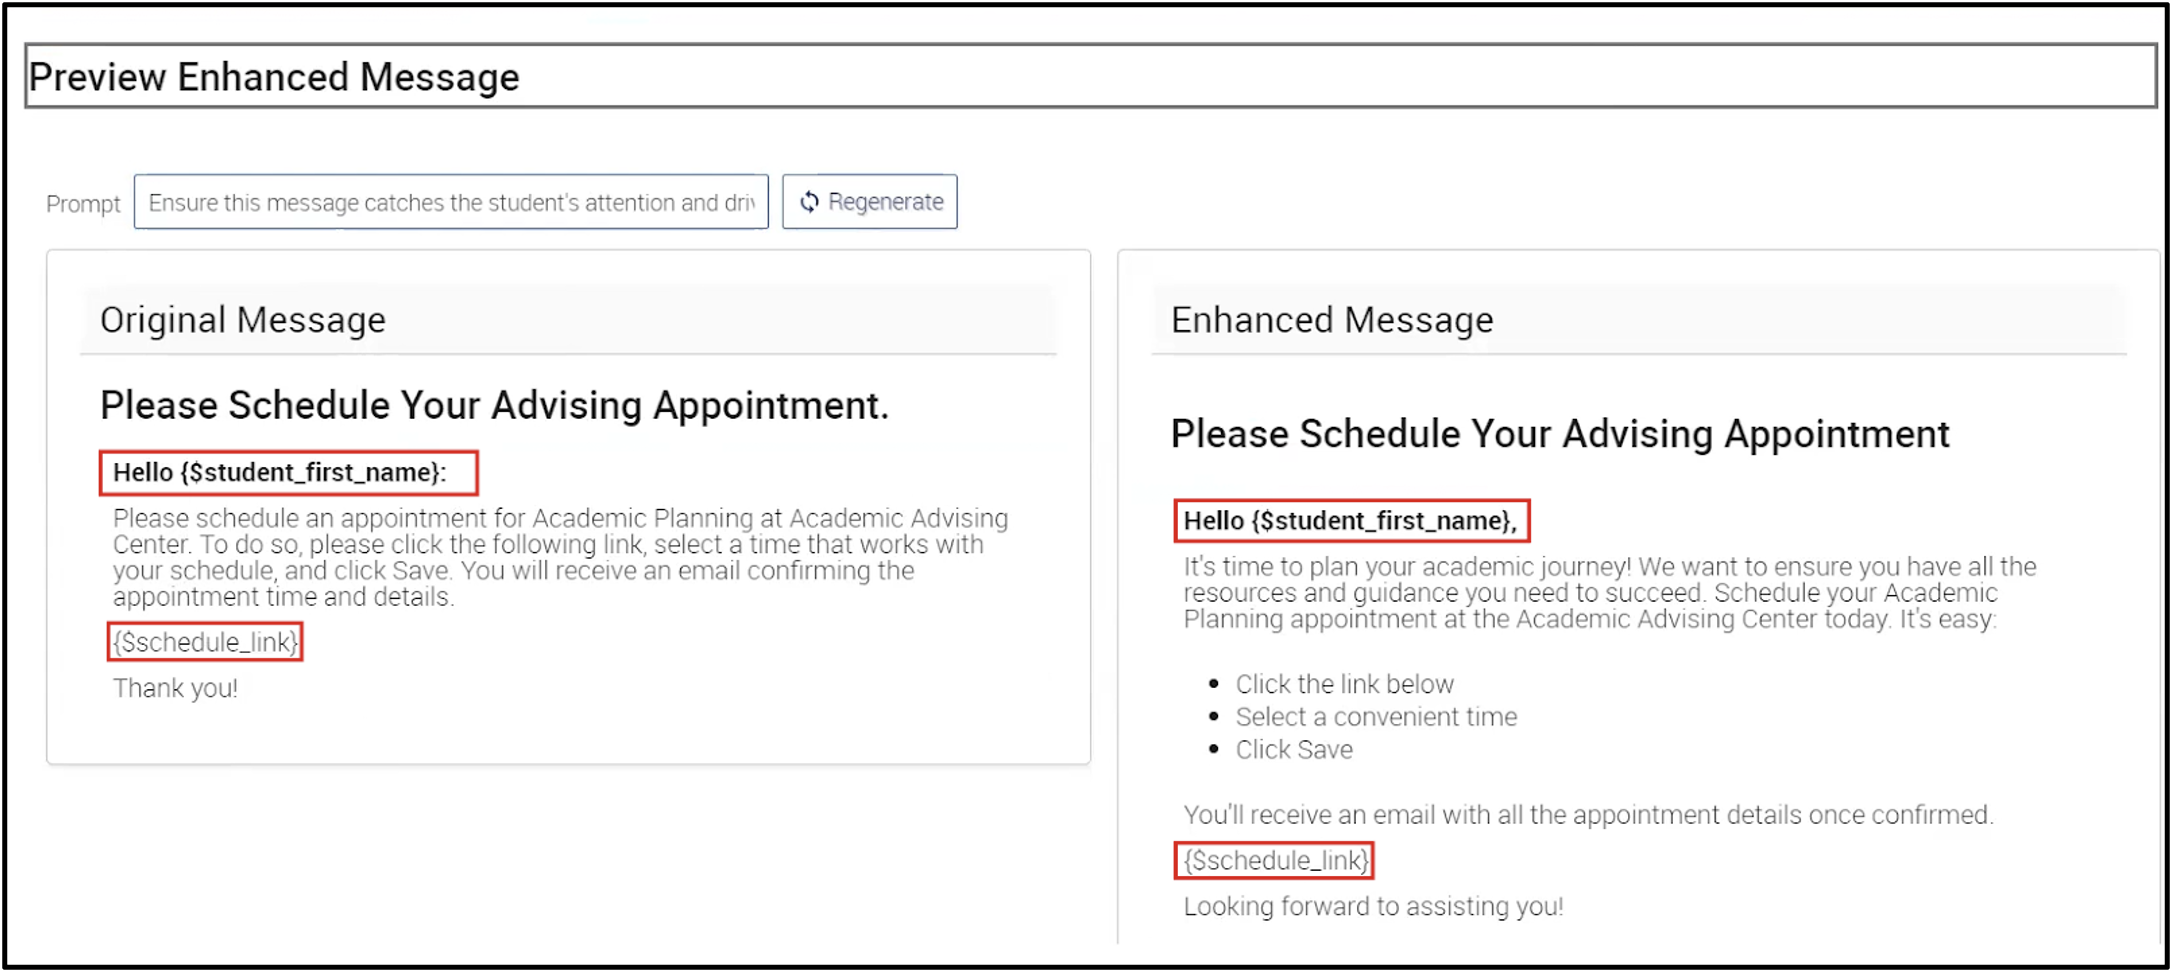
      • The tool will create a structured draft including discussion topics, decisions, and action items.
      • You may adjust or refine the output using prompts if additional clarification is needed.
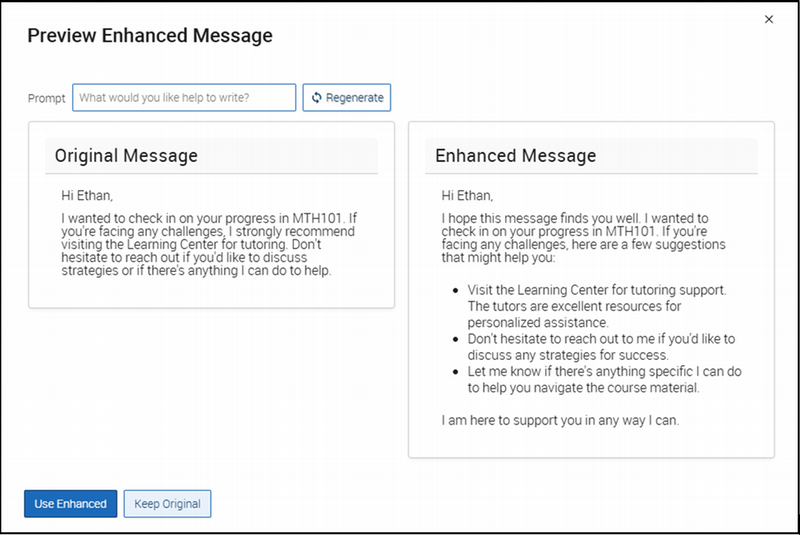
    4. Review and edit the AI-generated content.
      • Correct any inaccuracies.
      • Remove unnecessary or sensitive information.
      • Add additional context or details where appropriate.
    5. If needed, you may regenerate the summary or make additional edits before finalizing.
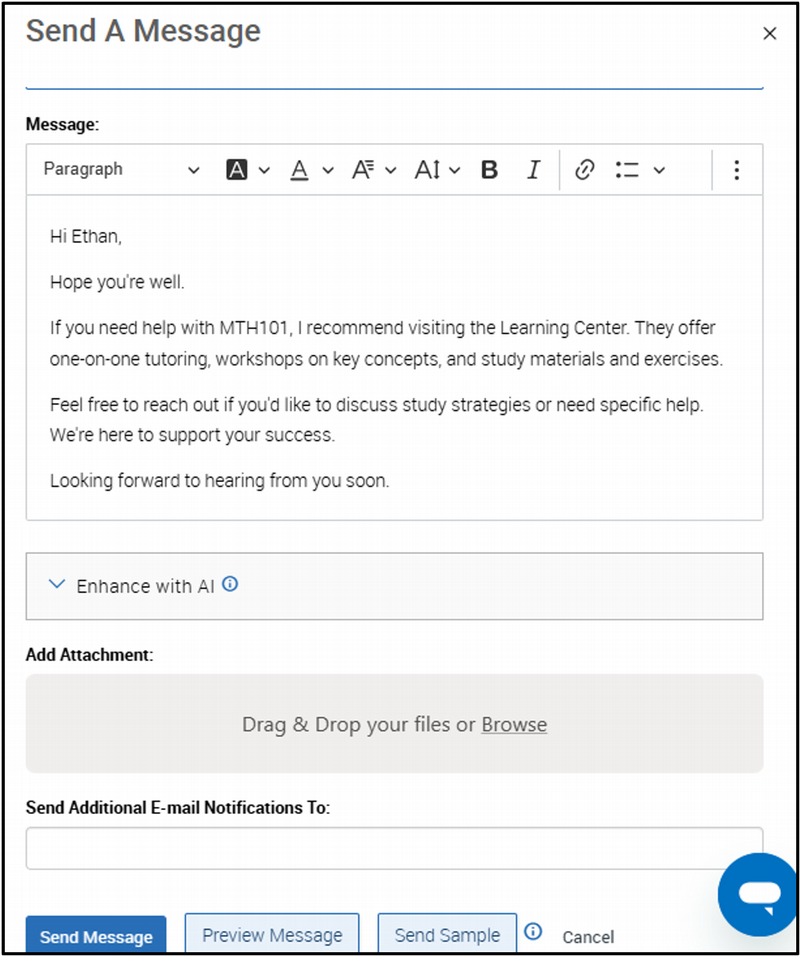
    6. When satisfied, insert the finalized content into the Appointment Summary Report.
    7. If sensitive topics arise at any point, or if requested by the student, turn off the Meeting Summary Assistant immediately.
    8. Once fully reviewed and finalized, save the Appointment Summary.

    Usage Guidelines to Keep in Mind:
    Important Privacy + Scope Notes

    Important: No audio is recorded or stored by Navigate360 or our third-party transcription service. The Meeting Summary Assistant uses live transcription that generates a transcript temporarily available on the Appointment Summary Report. Navigate360 does not store the transcription after the Appointment Summary Report is saved or closed, and neither does the third-party transcription service.

    These guidelines apply to the use of the Navigate360 Meeting Summary Assistant feature only. The use of other third-party AI meeting assistants is not authorized.

    Student Consent (Required)

    Student consent is required to use the Meeting Summary Assistant. Students (and any other meeting participants) must explicitly consent before the tool is turned on.

    Suggested consent script:

    “I’d like to ask your permission to use an AI tool that helps me draft notes and action items from our meeting. Using this tool helps capture follow-up items and reminders, but it is completely optional. I will review and edit everything for accuracy before saving any information in Navigate. Are you okay with me turning it on?”

    When to Disable the Tool (Anytime)

    Be prepared to disable the tool at any point, either upon the student’s request or if sensitive information is being shared.

    Do Not Use for Sensitive Topics

    Do not use an AI meeting assistant when discussing sensitive topics such as (but not limited to):

    • Crisis or safety concerns, mental health, or medical details
    • Title IX or conduct matters
    • Legal or immigration issues
    • Situations involving high sensitivity, conflict, or student discomfort

    When in doubt: turn it off. Protect the student’s privacy and safety.

    Review Before Saving (Required)

    Always review the output before saving the Appointment Summary. All information entered in Navigate becomes part of the student’s official academic record. AI summaries or transcripts should not be saved until you:

    • Read them thoroughly
    • Correct errors to ensure accuracy
    • Remove unnecessary or sensitive information
    • Add additional context or details if needed
    Recommended Prompts (Consistency + Safety)

    Use this structure for consistency and safety:

    • Topics discussed (2–5 bullets)
    • Decisions made
    • Action items (who / what / when)
    • Referrals or resources provided
    • Follow-up plan

AI Message Creator and Enhancer

NavAI message enhancements are available anywhere you write messages to students within Navigate360, including:

  • Message to a Student (individual outreach)
  • Student Campaigns (such as appointment nudges or enrollment reminders)

Accordion Group

Open All Tabs
  • Using AI Message Creator and Enhancer

    1. Select a student and click 'Message Student'.

    • Paste your draft message and navigate to the Enhance with AI tab.

    2. Click on 'Enhance with AI'.

    • Choose how you'd like to improve your message using any combination of:
      • Prompt – Write your own instruction
      • Tone – Casual, Direct, Formal, Inclusive, or Urgent
      • Message Length – Short, Medium, or Long

    3. Leave options blank to apply a general improvement, then click 'Enhance' to generate suggestions.

    4. Review the enhanced message in the 'Preview Enhanced Message' window.

    • You can enter a new prompt to make further edits if needed.

    5. If you want to remove something specific, like a bulleted list:

    • Enter a prompt (e.g., "remove the bullet points") and click 'Regenerate'.
    • Use 'Version History' (top right) to go back to earlier drafts.
    • When satisfied, click 'Use Enhanced'.

    6. The enhanced message will automatically appear in the Message box, ready for you to send.

    7. You can also enhance Message Templates.

    • Use AI to personalize or adjust tone for saved templates.
    • In Campaigns, merge tags like the student's first name and scheduling link will remain intact.

AI Report Finder

Easily discover the right V3 report, explore its contents, and apply filters—all by asking in plain language.

Accordion Group

Open All Tabs
  • Using AI Report Finder

    1. Navigate to the 'Reports' tab, select 'Standard Reports', and click 'AI Report Finder'.

    • This opens a search bar where you can type questions or explore data.

    2. Ask a question to explore the contents of a specific report.

    3. Ask follow-up questions to better understand the data fields in the report.

    4. You can also compare two reports side by side.

    • Use this to decide which report better meets your needs.

    5. Use 'AI Report Finder' to locate the relevant report and apply the appropriate filters.

    • Clicking the "→ Students Report" link will open the report with filters automatically applied by the AI Filter Assistant.

    6. The filtered report will open, ready for review.

    7. To adjust filters, click 'AI Filter Assistant' in the top-right corner.

    • You can type a request like “Add GPA > 3.0” and click 'Generate Filters' to apply.

    • In this example, the 'AI Filter Assistant' added the GPA requirement.

    8. You may also use the 'AI Report Finder' to explore ways to analyze data beyond what’s displayed in the report.

    • It can provide guidance on tasks such as calculating campaign response rates or refining outreach strategies.

AI Filter Assistant

Quickly apply plain-language data filters within any V3 report, while respecting existing data access permissions.

Accordion Group

Open All Tabs
  • Using AI Filter Assistant

    1. Navigate to the 'Reports' tab, select 'Standard Reports', and open a V3 report (e.g., 'Appointments Report'). 

    2. Click the 'AI Filter Assistant' button in the report.

    3. Describe the data you're looking for using everyday language (e.g., the type of appointments you want to see within a specific time range), then click 'Generate Filters'.

    4. Review the data filters applied by the AI before running or saving the report.

    5. Run or save the report as you would with any standard report.

    Use Examples:

    A. You can use the 'AI Filter Assistant' within the 'Students Report' to identify College of Business students who can be sent text messages.

    • Review the filters applied by the AI for accuracy and relevance.

    B. If you need to add a GPA requirement, click the 'AI Filter Assistant' button in the top-right corner, adjust your prompt, and click 'Generate Filters' to apply the new criteria.

    • The AI Filter Assistant added the GPA requirement:


Frequently Asked Questions

Accordion Group

Open All Tabs


Technical Support

For technical support, please contact the Learning Platforms Helpdesk.

Top